Winter Capsule

This post has been so long in coming. I am so sorry! Spring is already on it’s way, and I am only now posting my Winter Capsule.

I know I have already been (unintentionally!) absent for awhile now, but I am planning for this to be my last post, at least until life resettles. I was excited to start my blog to share some fun things I was learning and help others simplify their lives, even in little ways, and I was able to share a few of those in earlier posts! Over the past few months, however, my toddler and one year old have shifted to completely different schedules; they interact more, take less (or no!) naps, and need more one-on-one focused attention. I know many moms with littles that still manage to make time for blogs, or work from home in other ways, which I think is absolutely wonderful. But blogging isn’t my income, or even my passion, so for now I am choosing to back off completely until life looks a little different. Thank you all so much for the comments and time you spent reading my blog!


On to my capsule!

Originally, my first reason for delaying this post is that I was really struggling to fill out my capsule. I was hoping to add one more warm sweater to the mix, but I was very indecisive. Over Black Friday weekend I ordered several options from 3 companies (LOFT, American Eagle and JCrew Factory) looking for a winner, but I just didn’t *love* anything. I do this sometimes. I get this ideal in my head and can never actually fulfill it. Normally I give up, and just make do without “the one”, but Stitch Fix was offering a holiday promo for a free fix (with no styling fee). Since shipping both directions is always free with Stitch Fix, I decided to give it one last try, since I wouldn’t be out anything if I chose to send the shipment back. But actually, I found a winner– A marbled gray sweater with fun elbow patches, and long enough in the back to wear with leggings! I wear it at least once a week, if not more.

My second reason for delaying is because I really struggled with my Fall Capsule, and I wasn’t sure I was ready to try putting together a new one. I am really not 100% sure why I had such a hard time ironing out my wardrobe, but I had to tweak it several times before I even posted it, and I still ended up with a couple extra pieces in there, and 1 or 2 that got booted.

I think my primary issue was the weather. I’m not even sure a “Fall” wardrobe is even practical here in Northern Idaho. We had a true fall season for all of 3 weeks, and I did not plan for enough layering options. I was extremely warm for the first month and a half (lows in the 40s, highs in the 80s), and then had to incorporate some cold weather items well before the three month capsule period had even ended! During our 3 glorious weeks of Autumn, I loved my clothing. But next time, I may have to plan on more layering options rather than 3/4 sleeve sweaters!

Secondly, I ended up having to directly replace a few items that I thought were perfect originally. My two pairs of ponte pants from Maurices kept developing small holes along the seams, and although the store kept returning/exchanging them for me without any issues, I did give up after my 3rd black pair. I ended up with ponte pants from Macy’s Celebrity Pink line. Great quality? Probably not so much. But at that point, I was pretty short on bottoms, so I went ahead and purchased them. They may not last forever, but I love them, and they were on sale for $22 each! I haven’t regretted it yet, and they’re a staple in my winter capsule, too!

Then, at the same time my pontes started developing holes, my cords started sagging like crazy after just a few hours of wear. I had purchased them a couple of years back while I was still holding onto a bit of extra weight after my daughter’s birth, and although they seemed to fit well when I was assembling my capsule, they became unwearable after about 2 hours. I was down to only 2 pairs of pants total at this point. So I ended up replacing my cords as well. If I had known I would be able to replace my pontes, I might’ve skipped the cords, but I found a great replacement for those almost immediately, so I jumped on it.

The only other item that I added (I think) was a top from LOFT. I was really hoping for a boat-necked striped top when I assembled my capsule, but they were sold out in my size pretty much everywhere. My husband loved the striped tee from H&M, so I settled with that. But then I came across the perfect top one day and had to add it! So there was one extra item. Later on in the season, when I had decided I needed another cardigan for my winter capsule, I snagged a striped Banana Republic cardigan from Goodwill. I did wear it a few times before November was over, but you’ll see it below in my winter capsule. Finally, using some birthday cash, I also replaced my 3 year old faux leather Payless riding boots with some leather ones I found at a local consignment store.

So I certainly didn’t make it three months without buying anything new. And that bummed me out. But all-in-all, having a capsule has significantly helped save me from impulse purchases. When I go shopping, I now go looking for a very particular item (even if it’s at a thrift or consignment store). If I don’t see it, I don’t buy anything else. And I have almost always stuck to that. Also, I did personally hold myself to a “one item in, one item out” rule. So I kept my wardrobe the same size (I actually think it is smaller than it started out as), and almost exclusively replaced items rather than adding completely new ones.

Despite my frustrations with my last capsule, I do have two or three favorite things I discovered this past season.

1. My capsule made packing for vacations so so much easier. Before I started this project, I would procrastinate packing like crazy. I don’t know how many hours my poor husband spent sitting with me, the night before we were supposed to leave, helplessly watching me agonize over what to pack as I unintentionally disregarded his suggestions when he tried to give input. Now I can pack everything, including shoes, in about 5 minutes, and spend the rest of the time getting other things done.

2. SHOES that go with almost everything! I had 7 pairs of shoes in this capsule (not including my workout/running shoes), and that was more than enough for me. I didn’t wear my flats a whole lot, and could’ve made do with just one pair of heels. A year ago or so, I remember reading something about the average woman owning about 20 pairs of shoes. I went into my closet and counted. I don’t remember the number, but it was well over 20. I purged that night, but still had more than I really needed or wore. So 7 pairs for 3 months was perfect. I obviously have more than 7, because I have some sandals, etc, for Spring/Summer. But less than 2o now, I’m pretty sure 🙂

3. Everything coordinates. My 2.5 year old daughter absolutely loves helping me pick out my outfit for the day. I don’t let her do it too often because she has a tendency to bossiness as is, but when I do let her, I almost never have to veto her choices. Almost everything can be mixed and matched– not every single piece, but enough of the options work together that it makes my daughter’s (and my!) job much easier. I now get dressed in about 2 minutes most days and have even done it in the dark on several occasions when I get up before my husband. I love it!

So enough on my Fall Capsule! Please comment with any questions and I will try to answer before I take a hiatus 🙂

For this next capsule, we almost stayed within budget (we did if you include some of the purchases under birthday/Christmas money). But I’m hoping that in future years, we will have a surplus in the budget during these rollover seasons! I had to buy my 2 warm coats new this year (and hopefully I won’t need to do that again for a long time!), and if I hadn’t had to replace my cords, we would have the extra cash from that as well! All-in-all, I was pretty happy with the turnout!

Here is what I have for the winter months (Dec-Feb)! I’m pretty excited about it! A significant percentage of the items are rollovers from the last capsule (marked with a *), but there are a handful of new items thrown in there (which I’ve bolded). If an item is highlighted in burgundy, it means it is one of my favorite/wear all the time pieces.

**note, since originally writing this post a month or so back, I have found a couple items at thrift stores for “Spring” that filled some holes from last year, and I’m already wearing them like crazy: light wash jeans, a denim jacket (which I have somehow never owned), and a navy lace top. Not a great seasonal capsule victory, but I am in love with the three pieces, they are very versatile, and I know I will wear them to death. So I guess that’s a plus! I am also learning that in the winter, I almost NEVER wear a couple of the lightweight “sweaters” I included. All that to say, just don’t take me or my posts too seriously, ha! I love the concept of a capsule wardrobe, and it has been so helpful for my time and organization. But I am definitely still learning a lot about what works best for me, our budget, and my sanity (and the same thing may not work for you)!

XO Julie

**All Stitch Fix links are my referral link. I get $25 credit if you sign up for an account and order a shipment through my invite! 
***All ThredUP links are also my invite link. But if you sign up and order through my link, we BOTH get $20 off an order! So if you’re interested in either service, I’d love you to use my affiliate links 🙂 Thanks so much!


LOFtwalnutsweatercONlooseweavesweatercHMChambraycGAPslouchtopc    
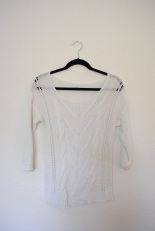
From Left to Right: Walnut sweater (LOFT), White Open Sweater (Old Navy, thrifted)*, Chambray (H&M)*, Slouchy Tee (Gap)*

BRFactoryhoodiec   Pixleyblousec  HMstripetopc  GreyGAPsweaterc
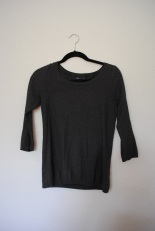
From Left to Right: Cowl Neck Sweatshirt (Banana Republic Factory, Thrifted), Floral Blouse (Stitch Fix), Striped Top (H&M)*, Dark Gray Sweater(Gap Factory-thrifted)*

LOFTstripedTcIMG_108141HawthornNavyCardigantargetcardiganc
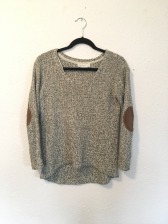
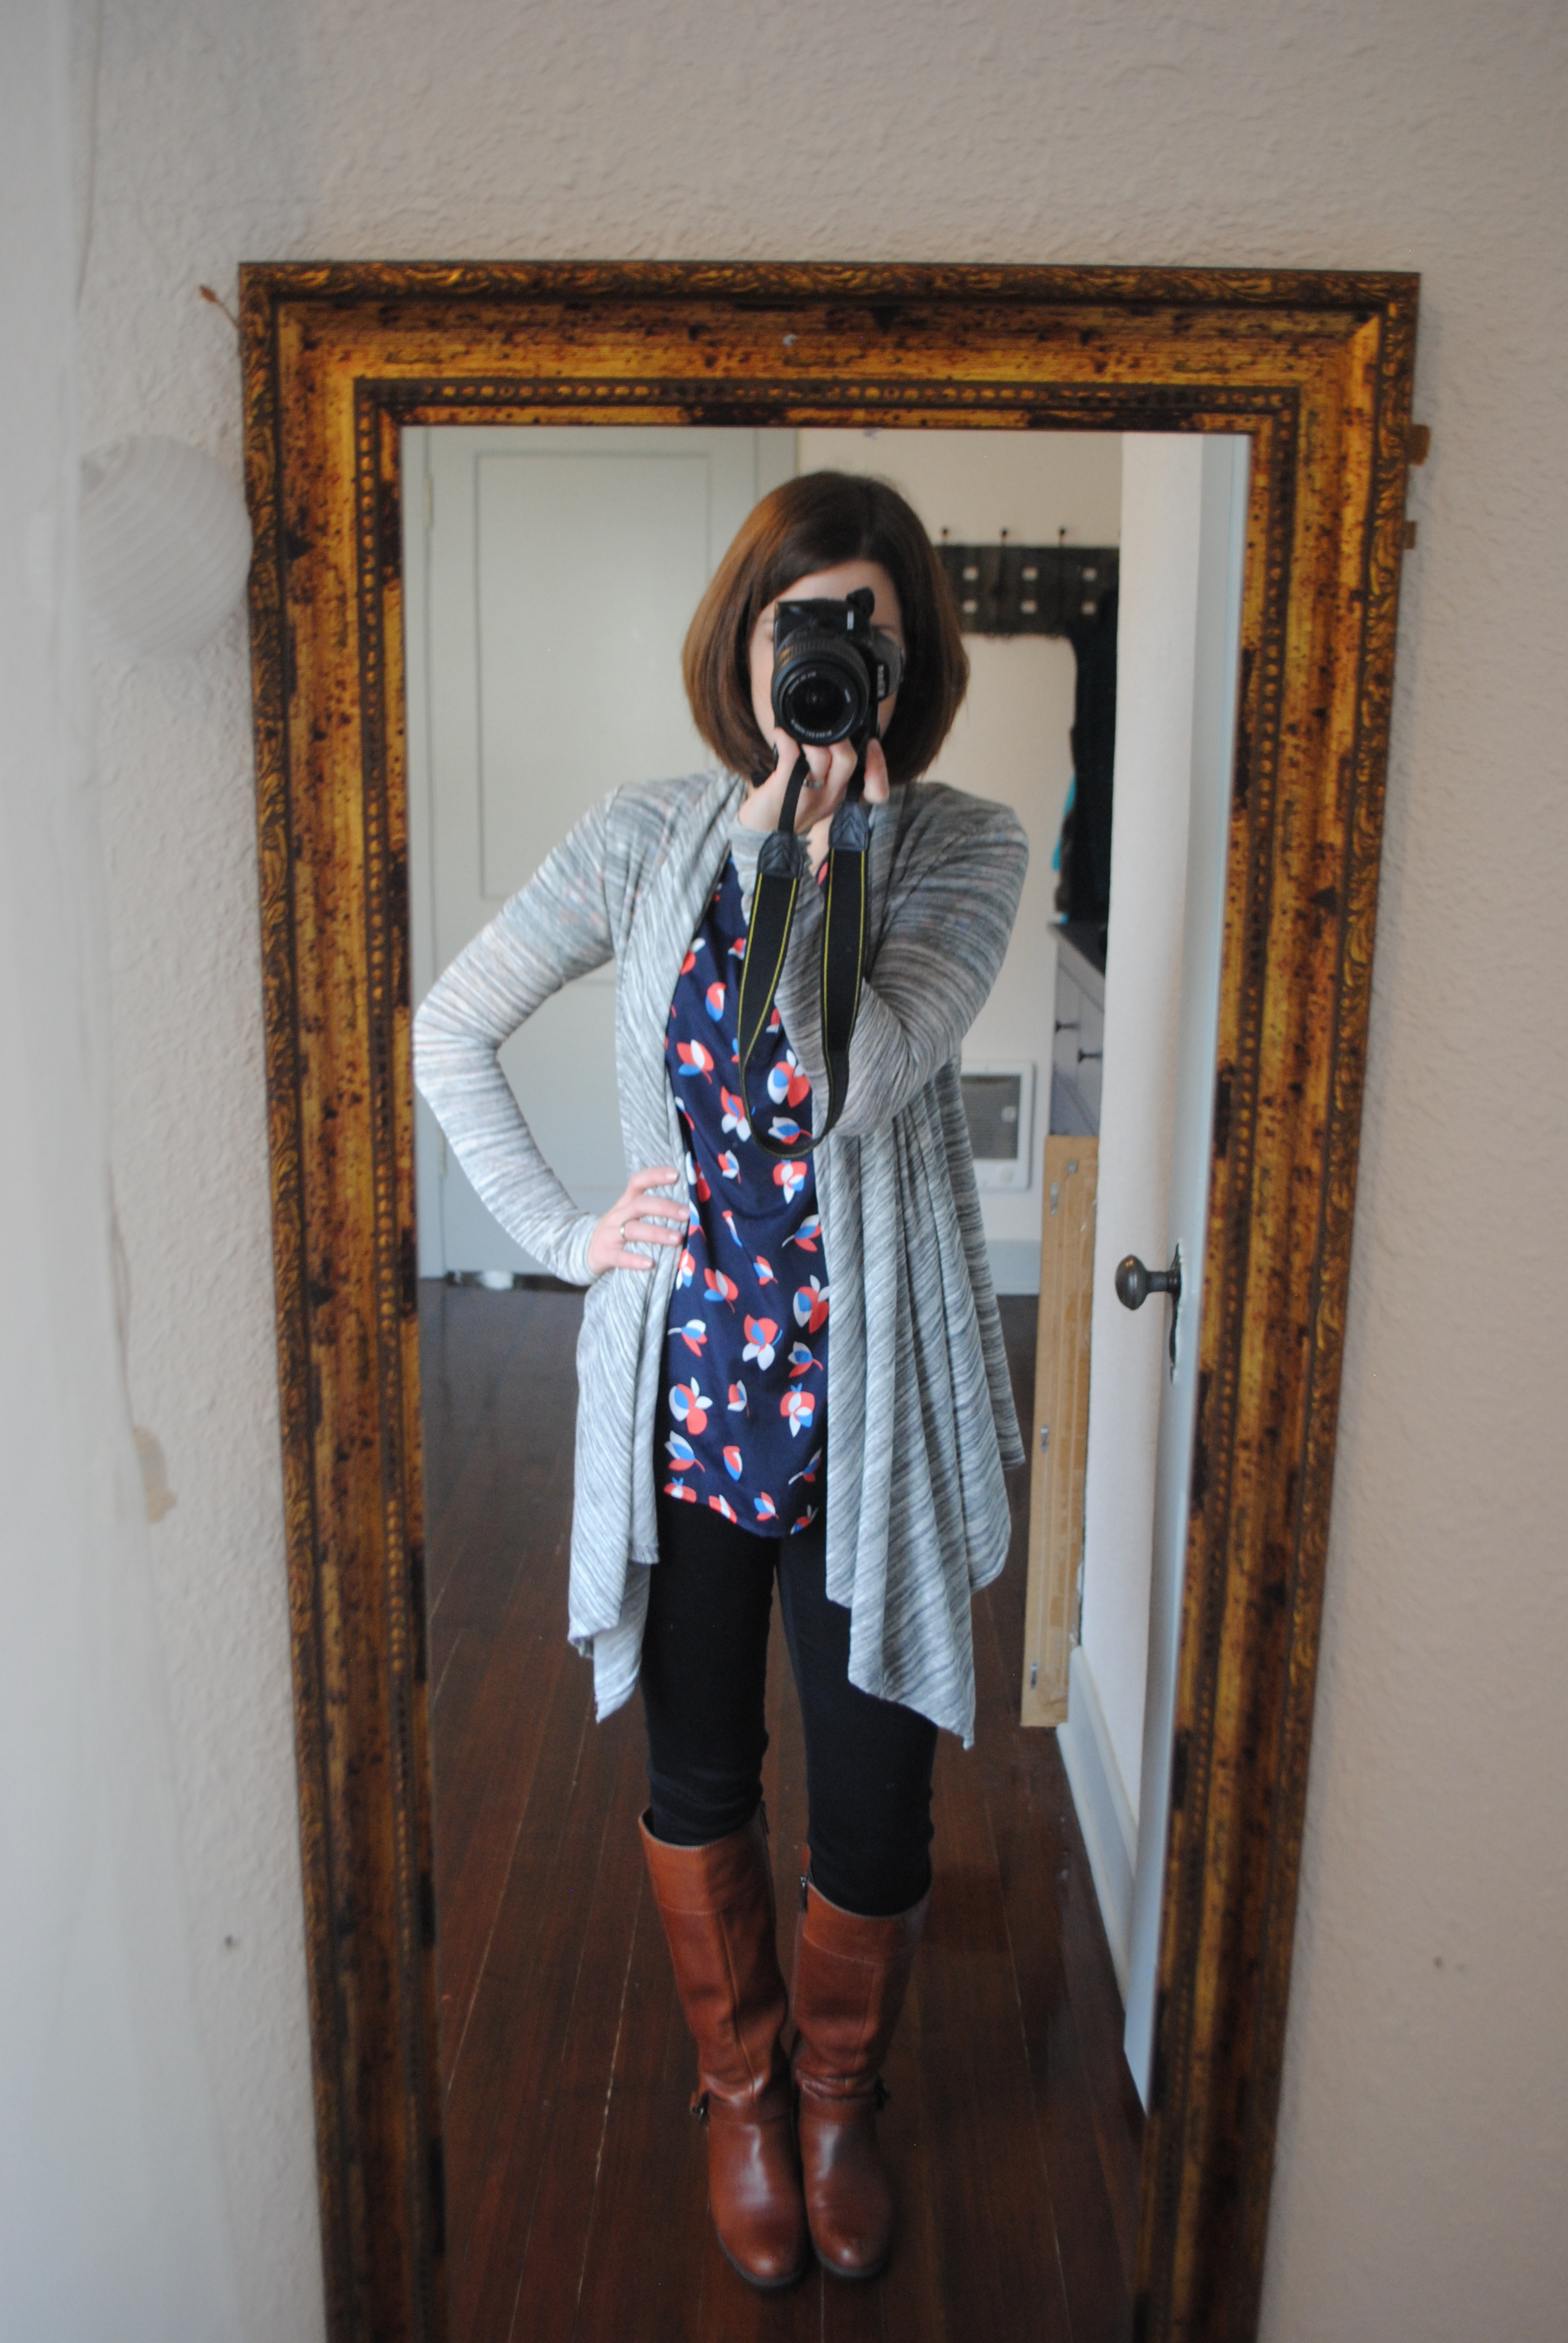
F  From Left to Right: Boatneck Tee (Loft-thrifted)*, Elbow Patch Sweater (Stitch Fix), Open Cardigan (Stitch Fix)*, Gray Cardigan  (Target)  

brcardicburgundycardiBananaRepublic PinkSweatercGapNavySweaterc
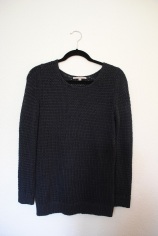
From Left to Right: Striped Cardigan  (Banana Republic Factory–thrifted), Burgundy Cardigan  (St John’s Bay/JC Penny)*, Pink Cardigan (Banana Republic- thrifted)*, Chunky Sweater (Gap via ThredUP)*

MauricesPlaidc LOFTsilversweaterc MauricesPeachSweaterc LOFTrusttopc
From Left to Right: Plaid Button Up (Maurices)*, Lightweight Sweater (LOFT via ThredUP)*, Rose Sweater (Maurices- thrifted)*, Burgundy Sweater (LOFT via ThredUP)*

ONnavyblousecLOFTcordscLOFTjeanscLiverpooljeansc
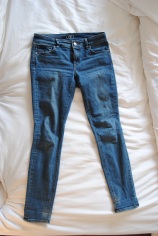
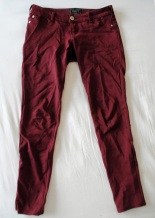
Patterned Blouse  (Old Navy-thrifted)*, Burgundy Cords (loft)*, Skinny Jeans (loft)*,            Bootcut Jeans (Stitch Fix)

blackpontesburgundyskinniesc  kathyfitandflarec   PinkDressc
From left to right: Black Pontes  (Celebrity Pink)*, Burgundy Pontes (Celebrity Pink)*, Striped Dress (Stitch Fix via B/S/T board), Pink Dress (thrifted)*
NavyHMDress IMG_5601 (1)SFskirtc
From Left to Right: Navy Dress (H&M)*, Navy Skirt (Gap)*, Gray Textured Skirt (Stitch Fix)

puffy coatc     wool coatc   DSC_1061
From left to right:  Down Puffy Coat (Ralph Lauren via Ross), Wool Coat (Land’s End). Black Heels (Nine West)*

DSC_1050 DSC_1042 DSC_1040
From left to right: Nude Heels (thrifted via local store)*, Black booties (fergalicious)*, Cognac booties (Tesori – thrifted via EBay)*                                        

IMG_1123  IMG_1124
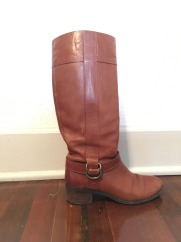
From left to right: Riding Boots  (thrifted from a local store)*, Duck Boots (SPORTO)

November Stitch Fix #2: A Complete Win!

November means that my winter capsule is coming up, and it’s time for another Stitch Fix* post! I am incredibly excited to share this month’s fix. It was amazing, and I may end up keeping every piece!

So what is Stitch Fix again? (For those of you who already know, and just want to see pictures of my fix, scroll on down!).

Stitch Fix is an online styling service that picks and chooses 5 unique items for you based on your height, weight, sizes, style preferences, etc. Your 5 items are delivered to your doorstep, complete with a personal note from your stylist and a style guide giving you ideas for pieces to pair with your fix. You try on the 5 items in the comfort of your own home, mixing and matching with your wardrobe, keep what you want, and send back what doesn’t work within three days. There is a $20 styling fee, but if you keep anything, your $20 styling fee is applied to your order, so the service is essentially free. If you keep all 5 items, you get 25% off your entire order, making the prices really reasonable for what you get.

This is probably not a great service for the girl who absolutely loves shopping and has a lot of options nearby. I love new clothes, but I hate the process of actually trying items on at the mall or picking them out online, only for them not to fit when they come. We live in a tiny town, and our very small mall has only a handful of stores that everyone else in town also shops at. So I either have to online shop, or plan a semi-regular trip to the larger city 2 hours away with many more options! With ordering, sometimes I end up returning everything, and I’m out the shipping fee one or both ways anyhow (so the Stitch Fix styling fee seems even more reasonable!).

I know that people may be worried that they aren’t going to get items they love, and then they’ll be out the styling fee. It’s true! But for me, it is worth the risk. I love the fun of the surprise box, the uniqueness of some of the items, the personal touch of a stylist who hand picks items and writes you a note, and the ease of shopping. You can link a detailed Pinterest board to help your stylist out with your tastes, and take a look at Google and Pinterest for Stitch Fix specific items. If you request or pin them, your stylist will try to send you those or other similar items if they aren’t available. There are also Facebook groups (one with almost 26,000 members) where you can try to sell an item (if you want to recoup your styling fee). Things really do sell on those pages, too! It’s crazy. But if you want more information on what types of things Stitch Fix asks you during the signup process, see my other Stitch Fix post here.


But on to my review! 3 months ago, when I received my first fix, I loved the surprise and fun factor of it so much that I was itching to get another box as soon as possible. But because I’m trying to really limit my wardrobe, I decided to wait until November (when I would be wanting to add a few winter items) for my next fix. I chose my birthday (November 14th) for the next delivery date, and waited impatiently for the date to arrive. It came one day early, on the 13th, and it was a wonderful birthday gift!

I asked my stylist for several different items, and she delivered on almost everything (they only send 5 items, so I couldn’t get it all)! I requested warm pullover sweaters, tunic tops, a lightweight gray cardigan, a stretchy skirt, maybe a dress, and a pair of skinny or bootcut jeans.

Here is the box, waiting to be opened!

Stitch Fix #2: November 2015

My clothes, all wrapped up pretty!

Stitch Fix #2: November 2015

The first item I pulled out was the Pixley Ivy Split Neck Blouse. And oh my goodness, it was PERFECT!! Okay, it wasn’t warm… or any of the items I requested, but I did have it pinned on my Pinterest board, and it was so me! I immediately fell in love with it, and wore it all day Saturday with a cardigan, some jeans, and a pair of black ponte pants. Verdict: Keep!

Pixley Ivy Split Neck Blouse

Here’s a photo of the blouse styled for slightly warmer weather.


Pixley Ivy Split Neck Blouse

Next, I tried on the Pixley Bardy Cable Knit Sweater. It was a pullover like I asked for, and so warm and cozy! I could hardly take it off — it has a small percentage of cashmere! It has the large open neutral space at the top, so the stylist recommended a scarf to help make it pop.

Pixley Bardy Cable Knit Sweater and Liverpool Loren Bootcut Jeans

I also tried it with some colored skinnies, and a necklace, and liked it that way, too!

Pixley Bardy Cable Knit Sweater

I am worried it’s a little big. It definitely fits very loosely in the arms and in the body, but it is incredibly warm and comfortable. I think it is supposed to be oversized, because the length is a bit longer, too. I wasn’t sure about it when I received my box on Friday, but it is definitely growing on me. I think I may have to keep it. Verdict: Undecided, Likely Keep! (Edit: I kept it! And it has been perfect for fighting off the chill today!).

Next, I threw on the Renee C Heubert Space Dye Cardigan. I asked for a lightweight gray cardi, and my stylist delivered!

Pixley Ivy Split Neck Blouse and Renee C. Heubert Space Dye Open Weave Cardigan

Renee C. Heubert Space Dye Open Weave Cardigan

It was cute and fun, but I wanted something a bit more formal and streamlined to wear over dresses and with skirts. This cardigan has A LOT of fabric…. Both of my cardigans I own right now are longer open cardigans as well, so I don’t need another one.
Verdict: Returned (possibly keeping to get the 25% off)

I switched to my two bottoms next and tried the Pink Martini Textured Lacey Pencil Skirt. It was exactly what I was looking for. I wanted a skirt that looked put together, but was still comfortable and practical for sitting on the ground with the kiddos. This skirt fit the bill perfectly for me. My stylist recommended styling it with my new Pixley blouse for a more formal look.

I thought it looked really nice that way. But I also wanted to try styling it in a more casual fashion that would work for colder weather, so I pulled out a sweater, tights and my riding boots.

Pink Martini Textured Lacey Pencil Skirt

Pink Martini Textured Lacey Pencil Skirt

Here is a closeup of the skirt texture. It is really soft and stretchy.

Pink Martini Textured Lacey Pencil Skirt

It also has this really cute exposed zipper on the back, which I really like.

Pixley Ivy Split Neck Blouse and Pink Martini Textured Lacey Pencil Skirt

The only problem with it is that it is a wee bit tight in the waist… and I’m the smallest I’ve been in a while, so I’m not counting on it fitting any better later on. I would prefer one size up, so I emailed Customer Service about doing a size exchange, but I haven’t heard back. I *may* still keep it without the exchange because I needed to replace another pencil skirt I had in my wardrobe, and I love it so much. But I’m not sure. Verdict: Keep Pending Size Exchange (Edit: They were able to EXCHANGE!! Keep!)

Finally, I tried on the jeans they sent. The Liverpool Loren Bootcut Jean. I asked for a pair of new jeans because I don’t have a pair of dark wash (my favorite), I know bootcut is coming back into style, and one of my two pairs of jeans has gotten a little big. But I’ve worn skinny jeans for so long, I’m still at a loss about how to wear bootcut! I liked these, though, and they fit very well, especially in the front. They are a petite (28″ inseam), so the length was perfect for my 5’3″ frame. They just barely brush the floor with flats on.

Liverpool Loren Bootcut Jeans

Liverpool Loren Bootcut Jeans

They also are fitted enough along the knee that I can use boot socks and tuck them neatly into my riding boots. I paired them with my scarf I kept from my first fix, and the Pixley sweater from this fix.

Pixley Bardy Cable Knit Sweater and Liverpool Loren Bootcut Jeans

They pucker just a bit along the upper thigh in the back, but I think they will relax a bit as I wear them. They are probably keepers! Verdict: Undecided, Likely Keep! (Edit: Kept!)

All in all, this was an amazing fix! If you keep all 5, you get a 25% discount, which would make the cardigan free (plus I would save an additional $30). So, if they can do a size exchange on the skirt, I will keep everything and try to sell the cardigan. If they can’t… I’m still trying to make up my mind. I had quite a bit of referral credit, and I really love almost everything. So we will see!

Edit: They were able to size exchange the skirt, so it ended up being a 4/5 for me! I’m so excited.

Try it out for yourself! If nothing else, the box coming in the mail is lots of fun! And maybe you will get an item or 5 that you love!

Happy November!
xo Julie

*all Stitch Fix links are my personal referral link! If you sign up for the service using one of those links, I would be so grateful — and it will give me a little bit of credit towards my next fix! Thanks so much!

Linked Up with Maria at Crazy Together and Lindsey at The Pleated Poppy
LinkUp                         LinkUp

9 Different Ways to Style Your Burgundy Skinny Pants

One of my favorite blogs that I follow is Audrey over at Putting Me Together! She is a mom as well as a fashion blogger, so she has a lot of GREAT posts about mixing and matching various items for a capsule wardrobe that is definitely mom-friendly. She has such a fun style, and I have really enjoyed reading and gleaning ideas from her posts! I’m sure you have seen some of her fabulous tips on Pinterest, but if you are interested in capsule wardrobes and versatile pieces, definitely head over to her blog and check her out!

Anyhow, when I saw Audrey’s recent post on how to wear olive skinny jeans, it inspired me to share some ideas on how to wear one of my FAVORITE Fall staples, burgundy skinny pants. I wear my pair constantly. They are comfortable and fun, and add a great pop of color to my neutral tops (so I don’t even have to accessorize)! They are stretchy, soft, and mid-rise, making them so mom-appropriate with all the bending over and squatting I do trying to keep up with my little ones.

Here are 9 ways I love to style them!

DSC_1603b DSC_1573b DSC_1616b    DSC_1595b DSC_1518b DSC_1538bDSC_1527b DSC_1577c DSC_1559d

So as you can see, LOTS of grays, whites and navy, but the burgundy really helps add interest to a simple ensemble, don’t you think? I forgot to pair them with my flats as well, but I do that often, and they go just as well with those, too!

Below are a few links to find a pair of your own (ranging from $20-$170)!

1.  Maurices Smart Ponte Pant in Harvest Wine2. Paige Denim Transcend - Edgemont' Ultra Skinny Jeans (Sweet Wine) 3.Old Navy Long Pixie Pants in MarionBerry

4. H&M High Waisted Burgundy Pants5. Maison Jules Ankle Zip Detail Ponte Pants in Burgundy

1. Maurices Smart Ponte Pants (these are the ones I own!). Currently only available in a couple of sizes, but should come back into stock! Also available in black, gray, and teal.

2. Paige Denim ‘Transcend-Edgemont’ Ultra Skinny Jeans in Sweet Wine

3. The Long Pixie Pant by Old Navy in Marion Berry (also available in several other colors and prints)

4. Slim-fit high waist pant from H&M in burgundy

5. For something a little more interesting, try the Maison Jules pants with zipper detail!

What about you? Do you have burgundy pants for this Fall? If so, what do you most like to pair with them? And if not, what is your favorite colorful staple for this season? I’d love to hear from you!

30 Minute DIY Plaid Infinity Scarf and Free GIVEAWAY!

plaidscarf

DIY 30 Min Plaid Infinity Scarf

EDIT (10/5/15): Giveaway is now closed! Congratulations to Nicole G (via Instagram) who won the scarf! Thank you all for your entries!

Colorful scarfs and statement necklaces have been my go-to accessories this Fall to help make an outfit pop when I’m working with a lot of neutrals in my capsule. So today, I wanted to share with you a quick tutorial for making your own fun infinity scarf for the season! It’s easy, fun, and really should only take you about 1/2 hour-1 hr (at the very most)!

I am also GIVING AWAY the herringbone scarf featured in this tutorial to one lucky winner! To enter, please just comment below this post (or on FB/Instagram) with one quick line saying what your favorite go-to Fall accessory is! For more entries, share the tutorial to your FB, Twitter, Instagram, or Pinterest account and just drop me a line and let me know so I can add additional entries (one for each share!). The giveaway will be closed Sunday night (Oct 4) at midnight PST!

On to the tutorial!

You will need:

  • 1 yard of your favorite plaid, flannel, or jersey knit fabric (should be 44 inches wide). Regular cotton fabric doesn’t work well for this tutorial because it is a bit stiff to give a nice drape
  • A Sewing Machine, Scissors, Pins, etc
  • Coordinating Thread
  •  Iron/Ironing Board

1. Start by taking your fabric and folding it in half, short sides together (So if your fabric is 1 yard long (36 inches), you will fold it so that the fabric is 18″x44″).

DSC_1221

2. Cut or carefully tear the fabric in half along the fold, giving you two pieces of fabric, approximately 18″ wide and 44″ long. If you tear the fabric and it puckers like mine did, gently smooth the puckers and pull flat.

DSC_1226

3. Take your two pieces of fabric, and place them end to end, right sides together. Be careful to line up the pattern as well as you can. Pin.

4. Sew the two pieces together with a straight seam (1/4 inch seam allowance).

DSC_1230

5. Lay flat. Your scarf should now measure approximately 18″x 87″. Boy was this hard to get a picture of!

DSC_1234

6. Next, fold in half lengthwise (Right Sides Together), as shown below (9″ x 87″).

DSC_1235

7. Carefully pin down the length of the scarf, matching the pattern. This is the most time consuming part! I didn’t worry about this nearly as much when making my other plaid scarfs. The busyness of the pattern hid the unevenness. So if you are going for a really quick project, and the lines are less distinctive, you can use less pins, etc.

DSC_1237

8. Straight stitch down the length of the scarf, being careful to sew the seams in the middle down flat when you get to them.

DSC_1240

This will give you one very long tube of fabric.

DSC_1241

9. Now choose one end of your long tube (which should still be inside out), and fold it over about 1/2 inch, ironing the fold flat.

DSC_1244

Take special care to iron the seam flat as well.

DSC_1245

10. Turn tube right side out, and, being quite careful not to twist the scarf, place the frayed, un-ironed edge, and insert it about 1/2 inch into the ironed end.

DSC_1248

11. Pin, carefully matching seam to seam, and pattern to pattern (on both front and back). My seams in this part of the tutorial did not match up perfectly, so one side sticks out a bit more than the other. However, when you wear the scarf, just put this seam to the back, and voila! You can’t even see it!

DSC_1249

12. Top stitch the two ends together (you can use a smaller seam allowance here to make a less noticeable topstitch), and you have your infinity scarf!!

DSC_1250

Color, pattern, and texture for your wardrobe!

DSC_1258b

DSC_1269b

Also, the fabric for this tutorial cost me a little over $6 including tax, so it’s a pretty inexpensive way to accessorize! Even at full price, the plaids at JoAnns are only $9.99/yard. But to save even more, just wait for a good sale or a 40% off coupon! JoAnn’s has them nearly every week. Plus, their great app makes coupons easily accessible all of the time. No more forgetting the flyer at home or searching through your email at the register (I have definitely done both! So I love the app!!). 🙂

Let me know if you have any questions or comments about the tutorial! And remember, comment for a chance to win your own infinity scarf for this Fall season!

“But What About Color…?”: More Capsule Questions Answered!

IMG_8552

Fall is officially here– at least according to the calendar! And now that the season is upon us, I’ve heard from several people, “I really want to start a capsule wardrobe for the Fall, I’ve done a lot of purging, but I just can’t commit hook, line and sinker to the capsule rules.” Well, guys, you don’t have to! Remember, there don’t have to be rules about putting together a capsule wardrobe. There are options if you would like to stick to rules, but the only real “rule” is to love what you own and only own pieces you actually wear.

The number of items you choose to have is totally flexible!
 Courtney from Project333 chose 33 items including accessories, Caroline from Un-Fancy picked 37 not including accessories. The list goes on. I hover around 35-40 and don’t include accessories, but I’m not super hard-and-fast about it. I try not to shop, but I do allow myself to add an item if I see it during the capsule months, if it fits well into my current wardrobe, and if I fall in love with it. So flexibility is totally ok. I definitely think it can be helpful to give yourself a ballpark number of items to keep when planning your capsule, because it really helps you pinpoint your style and discover your very favorite pieces. But maybe you love something too much to let it go, but it goes over your preferred number of items? Feel free to try what I did! Keep it in your closet, hang it near the back. If you wear it and don’t have to force it into your wardrobe, perfect! If you never end up wearing it, then donate it. I did that with a few items after the Summer months, and it was easier for me to donate them when I realized I really never *did* reach for them.

But I have a confession here… where I broke my own “rule”. I have a striped cardigan from H&M that I think I should love! It makes me happy every time I see it, and it makes me happy when I wear it, but guys, I NEVER EVER DO wear it. And I don’t know why! I kept it in the back of closet when prepping my Spring and Summer capsules, and I still couldn’t do away with it when I put together my Fall capsule. I don’t really have a sentimental association with it, I just *love* it and can’t let it go. But something about it just doesn’t seem to meld with the rest of my wardrobe, so I never pull it out. I will probably donate/consign it when Spring rolls around, and I can no longer convince myself that it will work in a capsule, but for now it is still hanging there.

What you choose is totally up to you, don’t overthink it. Keep it simple. I originally thought having a capsule wardrobe meant every bottom had to go with every top, which had to go with every sweater, which had to go with every scarf, etc. I could not do it; it was just TOO MUCH black and white for me! I would Pinterest search “Colorful Capsule Wardrobes” because I wanted variety, print, pattern, and color (I even wish I had more of all those things in my wardrobe and might try to incorporate more into the Winter capsule). But I finally decided that didn’t have to be my rule; I would just mix and match as well as I could. For example, I have a pair of burgundy pants and 2 burgundy sweaters… definitely do not go together. But you know what, that’s fine. I can pair those burgundy pants with 10+ other tops in my capsule. I’ll survive. I have been frustrated when I’m really in the mood to wear my burgundy knit pants, and I can’t wear my cozy burgundy cardigan with them (and sometimes I do around the house ;)), but I’ve been able to make it work. And even when I had 2 or 3x as many clothes, I still sometimes had this problem. So you can totally make the matching rule for yourself if you want to, or you can just be a little more flexible and work around it. You can have patterned/colorful tops (I lean more that way) and basic bottoms, or patterned/colorful bottoms and basic tops. You will probably be a LOT happier if you choose one of those categories to be the interesting one instead of both, but still, that is up to you.

Capsules can blend into one another. I mentioned budgeting last week, but forgot to mention this as well. Fall and Spring capsules will definitely be your most expensive (particularly Fall – so don’t get discouraged if this is your first season trying a capsule)! For summer, you can just add in a couple pairs of shorts and a tank or two, and you’re set! For Winter, a heavy coat, some warm Duck boots maybe (if you live somewhere wet and snowy), and a couple of heavier sweaters. But you won’t need much! And you can even roll over from the completely opposite season if you would like. If you have a fun sundress that you don’t want to store under the bed for 6 months, layer it with a cardigan and tights, and keep it in your Fall wardrobe. It is perfectly acceptable, and looks adorable. Rolling items over is awesome, and you should do it if you can. It saves money, time, and effort. Don’t look past ways to transition an item to the next season.  Be creative!

You can always accessorize. This may be obvious to some people, but when I was first looking into the idea of a capsule wardrobe, I told a friend that it was just too much boring and neutral for me. I loved color too much to make it work. And she said, “I think you’re supposed to go neutral and accessorize with a color to make the outfit pop.” Sure, I thought, but does that work well enough? And yes! I think it definitely can (especially in Fall with Plaid and SCARFS!!!). Statement necklaces, scarfs, earrings, patterned flats! Don’t feel like you always have to wear a neutral top and a pair of jeans. Go for that if you’re looking for a basic, casual outfit, but you can always make an outfit pop with a scarf or a fun necklace, too. It can change your look with almost no effort at all.

As soon as I get a chance (aka buy more fabric…), I will post a quick tutorial for a 30 minute DIY infinity scarf to help you accessorize with this Fall. J I can be so impatient once I get an idea in my head, and as soon as it started to get cooler, I was on the hunt for a plaid scarf to jazz up my Fall neutrals. So after sweeping through our tiny mall with no luck, I popped into JoAnns and fell in love with some plaid fabrics. Then I went back with a coupon a couple of days later (download the JoAnns App! Easy access coupons whenever you need them!), and made 2 scarfs that afternoon during my kiddos’ naptimes. I can’t wait to show you how quick and fun they are to make! Be on the lookout for the post, and happy Fall!

Also, please feel free to leave feedback with questions or comments! I would love to hear from you and help you get started on your new wardrobe journey 🙂

*Also, if you’re interested, the necklace above can be found here. It is also currently 40% off, so grab it now if you want a fun Fall necklace to add a pop to your capsule!

Budgeting and Planning for Your Capsule

fallwoman

Well, I am back after an unintentional two week hiatus! Blogging has just not happened, but I have still been posting photos on Instagram of outfits that I put together each day with pieces from my capsule. If you are interested in following me on IG to get some more practical outfit ideas, you can find me at @capsule_cricket!

All that to say, I am so excited to be posting again for you all and answering a few questions about wardrobe budgeting and planning. I mentioned most of these questions and concerns in my earlier Capsule Wardrobe post, but I’ve laid them out a bit more extensively for you here!

I know when a lot of people hear “Capsule Wardrobe”Stitch Fix, versatile pieces, clothing you LOVE, higher quality items, etc, they immediately jump to “Ugh, there’s no way I can build a capsule wardrobe because we’re on a tight budget, and it doesn’t make financial sense. I will just stick with what I already have, thanks!” And ladies (or gents if you happen to be reading this), I completely understand where you are coming from! We are on a pretty strict clothing budget as well, and as much as I would love to have $1000 to spend on a perfect capsule, that is way outside of what I would be able to spend on a 3-month wardrobe right now.

So here are a few things to remember when thinking about a capsule wardrobe budget:

1) You may end up spending more than you would typically spend the first few times you put together a capsule.

Why? If you start by purging, you may have a lot of holes to fill in your closet at the beginning. For my Spring capsule, I stuck to my budget without too much difficulty, but my Fall capsule ended up costing me quite a bit more than I typically would spend. As I mentioned in my earlier Fall Capsule post, I haven’t purchased many cold weather items in my current size for several years. And to top it all off, the last time I was this size in the Fall months, I was still in college and had never had a baby. Now I have had 2! Needless to say, my build is a bit different than it was then! So after purging the items that no longer fit and weren’t my style, I had very very few tops, and only a couple of bottoms that worked. I knew it was going to be an expensive seasonal wardrobe, so I tried to be picky and choosy, and I thrifted several pieces. However, we still ended up making an exception and pulled some money out of savings to help cover what didn’t fit into our budget.

2) You are buying clothing for 3 months at a time.

Technically (and I am certainly not perfect), you are not supposed to spend anything on clothing for a full 3 months after creating your capsule– until it’s time to purchase items for the next season. So, upfront it seems like you are spending a substantial chunk of money, but distributed over three months, it is much more reasonable. For example, if you spend $300 on a capsule, that is only $100 a month, and you can budget for the upfront expense in the 2 months prior (when you’re not supposed to be spending anything! :D).

3) Once you have built a capsule, it should never cost as much to build it again next time the season rolls around!

This is my favorite one– and it is a large part of what makes the idea of a capsule wardrobe seem worth it to me. Once you have whittled your wardrobe down to items you LOVE, you will be left with far more space, and far fewer things to store. Next time the season rolls around, you may have to sub out a few items as trends, taste and weight fluctuates, but you will stick to your general capsule building blocks, and will be excited to wear them again! Seriously, I already peeked back into my Spring/Summer box to show my husband something and got all excited again about my previous capsule! I know I only finished wearing it less than a month ago, but I still love it, and wore the same ~40 items for 5 months without getting a bit sick of them! Also, guys, my #1 piece of advice: spend something on a pair of jeans!! Jeans roll over into every single season’s capsule. So find a pair that you feel comfortable and beautiful in. You won’t regret it.

4) It will help you avoid impulse purchases
When you put together your season’s capsule, take into careful consideration what you own, and what you would like to add to your wardrobe. Look at Pinterest, plan, put together outfits mentally, and MAKE A SPECIFIC LIST. Then, go out and buy what is on the list. It’s just like meal planning and grocery shopping. If you stick to the plan, you will save so much money on the last minute “oooh, I definitely need that!” purchases that you will likely regret, and that won’t fit with your current wardrobe. It may be a LOVELY, gorgeous blouse, but when you get it home you realize that you can only wear it with one pair of pants. Oh, and those are in the wash…. etc. I’ve definitely done that! If you stick to your list, you will save $ in the long run (or even in the short run) by buying exactly what you need.

5) You can definitely thrift and shop sales for your capsule!
I still plan to write a blog post about this because it is one of my favorite things, but seriously, don’t rule this out. There are some great consignment/resale sites out there (Ebay, Zulily, thredUP (note: if you sign up at thredUP via this referral, we BOTH get $20 towards our next purchase! What a deal :D), Threadflip.comSwap, Poshmark and others. And if you like a particular new item from a brand, wait until they have a big sale. Loft, Gap, Banana Republic, Old Navy, JCrew, AE, etc do 40% fairly often (definitely more than 1x/month). You just have to be patient. Look for items a few weeks-months before you’ll need them for your capsule, and grab them when a sale comes up! I bought a sweater and my trench for my Fall Capsule back in July. Breaking the 3-month rule? Well, yes, but I knew I needed them, and it definitely saved me money in the long run.

So take those thoughts into consideration when making a budget! If the capsule idea works like it is supposed to, those dollars will stretch, stretch, stretch! Unfortunately, because I have only done capsules for two seasons, I can’t vouch for this personally. The seasons haven’t had a chance to roll around again so I can’t see how many of the items still work in a year! But even in the worst case scenario, even if I can’t reuse any of the items, I have LOVED the simplicity, confidence, and organization that my capsules have added to my life since I started purging in March/April, and I would do it again without reservation.

Remember, building your capsule is the hard part! So be patient. I am always super frustrated at the beginning of the season, but once I have found the pieces I like, getting dressed and ready for the day is easy and fun! Even with two hungry kiddos under my feet 🙂

Two ways to tie a (non)infinity scarf

I had a request asking me to give a tutorial on how I tied my scarf for my First Stitch Fix Review, so today I wanted to show you my two favorite ways to tie an non-infinity scarf! I am very partial to infinity scarfs because they are simple and easy to tie, and they don’t conceal your shirt underneath the way a standard scarf does. But I do have several standard scarfs with patterns and texture that I absolutely love, so how do I get past it?

Well, here is the most basic way: MAKE it an infinity scarf! Many of you probably know how to do this already, so feel free to skip on the the second tutorial!

Start by folding your scarf in half end to end. Then knot the two corners, like this (I also knot the middle to keep it from gaping):

DSC_1132

It will look like this:

DSC_1134

Open it up and form it into a circle
DSC_1137

Then place it around your neck (just as you would an infinity scarf), knots to the back.

DSC_1148

Make it into a figure 8…

DSC_1163

Place the lower loop around your neck… and you’ve got yourself an infinity scarf!

This is it looped twice. You can also loop three times for more bulk.

DSC_1166

My second favorite way to tie a scarf is the way I had it in my Stitch Fix post– a kind of braid:

Start with the scarf around your neck, one side longer than the other. For this tutorial, let’s say the right side.

Scarf Step 1

Take the long end and flip it around your neck. Then even out the length of the ends so that they are the same.

Scarf Step 2

Next, take your left hand over and through the loop around your neck

Scarf Step 3

With that left hand, pull the right side up through that same loop. But don’t pull it all the way through. Leave the end still tucked.

Scarf Step 5

Finally, take the left end through the loop you have on the right side.

Scarf Step 4 ,

Pull tight!

Scarf Step 6

And you’re done! A simple, easy scarf braid!

Scarf Step 7

I know it looks confusing, but I had my husband try it and even he was able to manage it on the first try! So hopefully it will be just as straightforward for you when you try it out! Comment below if you have any questions

And there ya go! My two favorite ways to tie a non-infinity scarf! There are so so many other ways — Google, Pinterest and YouTube are all great reference sites! Check them out for more fun ideas 🙂

Fall Capsule 2015

It’s here! My Fall Capsule post! I’m pretty excited to be sharing it with you today, and I hope you like it!

To be perfectly honest, this capsule was super tough for me to put together, caused me a lot of frustration, and it is still somewhat in flux. Due to two pregnancies and postpartum weight fluctuations, I haven’t had a solid Fall wardrobe since 2011, and my style has changed a lot since then. So I spent a lot of time and effort trying to figure out what I really like. Some of my favorite stores are sporting styles that just aren’t me, so trying to find the ideal pieces hasn’t been easy.

As much as I would love the absolutely PERFECT capsule wardrobe, I am a SAHM and my husband is working his first job just out of school. We are on a budget and I had to try to be prudent with my purchases. The result was a few items that I ended up with aren’t absolutely ideal, but they work well in my capsule, and I can wait until next year’s capsule to replace them. For example, I really wanted a navy puffer vest for my wardrobe, but they are pretty pricey if you want a quality one, so I searched and haunted EBay until I found one (I thought) I liked! When it arrived at my door, it wasn’t exactly what I had expected. The collar was a large and floppy, and not at all what I had envisioned. But it was a non-refundable transaction, and the vest was comfortable, warm, and of high quality. Scarfs do a great job concealing the oversized collar, and when it’s super chilly out, it will look *great* zipped. So for this year, it stays. I just had to be realistic (even though it wasn’t perfect) and that was the best decision. And you know what? I’ve already worn it several times, and the collar may just grow on me as the season progresses! We’ll see!

Also, when you see my capsule below, I marked all the items I bought second-hand. This was because I wanted to show you that you CAN create a capsule that you love on a budget. I will write a more detailed post on thrifting your capsule later. Be on the lookout!


So on to the wardrobe! I have 40 items posted below (my goal is to stay at 40 or less), but at least 3 of the tops are much more summery, and will phase out as it cools off. If the item is in bold, I bought it new for this year’s capsule. If it has a * beside it, I rolled it over from my previous capsule.FallCapsuleCjpg

41HawthornNavyCardiganburgundycardi BananaRepublic PinkSweater  Gapnavywhitetank

From Left to Right: 41Hawthorn Navy Blue Open Cardigan: Stitch Fix August 2015, John Bay Burgundy Cardigan: JCPenny, Merino Wool Berry Cardigan: Banana Republic (thrifted)*,  Navy and White tank: Gap (thrifted)*

Loftpurpleblouse GapNavySweater GAPslouchtop  GreyGAPsweater

Purple Sleeveless Blouse: LOFT,* Navy Blue Loose knit Sweater: Gap (thrifted from ThredUP), Gray flowy tee: Gap, Dark Gray Sweater: Gap Factory (thrifted) 

LOFTrusttopHMChambray  MauricesPlaid  ONlooseweavesweater    

Rust colored sweater: LOFT (thrifted from ThredUP), Denim Chambray: H&M, Plaid shirt: Maurices, White loose weave sweater: Old Navy (thrifted)*,

MauricesPeachSweater  Zulillywhitetank DSC_1037 HMstripetop   

Beige sweater: Maurices (thrifted), White waterfall lace tank: Zulily*,  Striped Tee: Zenana Outfitters/Ross*, Striped Long Sleeve Top: H&M

ONnavyblouse LOFTsilversweater PinkDress LOFTStripeDress      

Navy patterned blouse: Old Navy (thrifted)*, Silver Sweater: LOFT (thrifted from ThredUPPink Dress: Cynthia Steffe (thrifted)*, Striped Dress: LOFT*

    LOFTjeans  DSC_1015 

 Ponte striped dress: Merona/Target (thrifted), Navy sleeveless dress: H&M, Medium Wash Skinny Jeans: LOFT*, Straight Leg Jeans: Paige Denim (thrifted)*,  

ponte pants burgundy DSC_1009ponte pants

Ponte knit burgundy skinnies: Maurices, Gray Skinny Cords: Target, Black Ponte Skinnies: Maurices*

DSC_1008 IMG_5601 (1) ROMYGraySkirt

Blue Pencil Skirt (thrifted)* Navy A-line skirt: Gap, Gray Pencil Skirt: Romy

DSC_1067   DSC_1065jcpenny coat

Khaki Trench Coat: Banana Republic Factory, Navy Puffer Vest: Joules (thrifted), Lightweight Khaki Anorak: St. John’s Bay/JCPenny 

     DSC_1050

Heels — Black Basic: Nine West,* Nude Alex Marie Slingbacks: (thrifted)*

    DSC_1059

Flats –Navy Ballet Flats: Payless,* Burgundy Ballet: Old Navy

DSC_1056  DSC_1042 DSC_1040

Boots — Riding Boot: Payless, Black ankle Bootie: Fergalicious, Cognac Bootie: Tesori (thrifted)

I am LOVING this capsule so far, and the weather dropped about 20 degrees this week, which has given some of these pieces a lot of use already! I would love feedback on what you all think, and like I said before, try it for yourself! You won’t regret it!

Guest Post: My Mom’s First Stitch Fix Experience– an A+!

I am so excited to have my first guest post on the blog today! My lovely Mom, Beth, writes on her first Stitch Fix experience, below. In short, she loved it!!

————————————————————————-

Just to show you that Stitch Fix isn’t just for the young (and skinny) I am going to swallow my pride and let Julie post pictures of me in the clothes from my first fix. I am sure almost all of Julie’s readers are way younger than me, but I figure they have moms and they want them to look cute too, right? :).  So do your mom a favor and give her a Stitch Fix gift certificate, like Julie gave me!

Like Julie, I had read about Stitch Fix a while ago, but didn’t think it would work for me. I mean, I am not super trendy and I don’t want to look 25. But the shopping options in Moscow, Idaho are pretty limited. There’s basically just Macy’s, Maurices and Old Navy. So you often end up with the same clothes as people you know. One Sunday I showed up at church in the same dress as one of my daughter’s 16 year old friends. She was probably way more embarrassed than me, but still- not good!

We usually go to Spokane a couple times a year for a major shopping spree, but I get exhausted at the mall so don’t end up with that much. Plus, I am super indecisive, and can never remember what else I have in my closet, so I often get home and want to return some things , or regret items I passed by. Finally, I am TERRIBLE at putting together outfits, so unless it’s a dress I’m never sure what will really look good together. And even with a dress, there’s still a necklace and shoes to match- so basically I’m sunk. :-).

Not only does Stitch Fix select clothes to fit your lifestyle, taste and body type, but they send you a “style card” (see below) which shows you what to wear with the items they sent- down to jewelry and shoes- yay! If this works, it will make my life so much easier and I’ll look so much more put together, so I decided to give it a try.

Before scheduling my first fix I did my homework. I read loads of reviews, and blog posts about “how to get the best fixes from Stitch Fix.” The best tip I got was to use a pinterest board. I love pinterest but 90% of what I pin is recipes- some of which I have actually made :-). Before this I had pinned almost no clothing. But I created a board titled “Stitch Fix” and started pinning away. Then, per instructions from bloggers, I meticulously commented on each pin- “I love this top, but not the color.” “Pinned this one for the scarf”, “Like this dress but it’s too short for me” etc.  Then I shared the board on my “Stitch Fix profile” which you create when you sign up (and can edit at any time).

I think my “hard work” paid off. My first fix was a 4/ 5 and almost a 5/ 5 (more on this later). Supposedly Stitch Fix considers 2/ 5 to be a success, and as long as you buy one item and don’t lose your $20 styling fee it’s worth it. So I hit the jackpot. I was so excited.

Here’s my actual review of Fix #1:

I excitedly grabbed my box and headed to Julie’s for the fashion show. Everything looked promising to me, but I started with the one that looked the most “me”: the Willa Dress from Collective Concepts. I had asked for some cute fall dresses (you can request specific type so items before each fix) and it definitely fit the bill. BUT–

Oh no- it was too tight in the bust and hips! I remedied the bust problem by adding a cami and wearing it unbuttoned, but it was just too snug in the hips. It looked fine under a jacket (more on the jacket later), so if the fabric had some give it would have worked, but it felt like a straightjacket. I should send it back, but I am hoping to lose some weight, so if everything else works it might be worth keeping. (if you keep all 5 items you get a 25% discount on everything so it would end up being free).

Verdict: Undecided 

IMG_8133

DSC_0833 (2)

I was really worried though as I got ready to try on the next item. What if everything was too small? That would be a major blow to my ego, not to mention a waste of money. Fortunately my fears were unfounded. The next item fit great, as did everything else.

I tried on the Papermoon Girtha dress. It wasn’t exactly what I was hoping for – it was sleeveless and seemed a bit too summery, but Julie convinced me that with a jacket or cardigan and tights it would transition well into fall. I also didn’t think it was super flattering on me, but Julie insisted it was, and my husband and the half a dozen other people I tried it on for 🙂 agreed. Plus is was super comfy.

Verdict: Keeping

DSC_0869

Next I pulled out the Kolby printed skirt from Gilli. It was not like anything I would have tried on in the store but I had to admit it was cute. And oh so soft and stretchy- it fit like a dream. Everyone thought it looked great on me, and most importantly I felt pretty in it. And it is so versatile. I pulled blouses, cardigans and scarves out of my closet and was able to make 15 outfits that I loved.

Verdict: Absolutely keeping

DSC_0867

They sent the Le Sample Hasset V-neck blouse to go with the skirt and It did look great with the skirt, either tucked in or loose. I loved the subtle pattern on the front and back of the bodice that made it lots nicer than a simple black tank blouse. The style card suggested I wear it with jeans and I tried that too and was happy with the look.

Verdict: Keeping

DSC_0862

Finally,they sent a denim jacket, Zayn by Kut from the Kloth, to go with both of those dresses as well as the skirt. I had asked for a “go with everything cardigan or soft jacket” (you can make specific requests in the “notes to your stylist” before each fix). So I guess they fulfilled my request, but it was definitely not what I was expecting. And if I had thought about it I would have written “no denim jacket” because I already had one. Why pay $88 for a new denim jacket when I had one? But this one was a good bit shorter than mine and I suspected it would hit me in a better spot and look nicer with the dresses. I tried both on and the shorter one did look much better. Plus, I thought back and calculated that my jacket was at least 8 years old, maybe closer to 10, so I felt justified replacing it.

Verdict :Keeping with reservations

DSC_0872

Back to the first dress- since I was keeping 4 of the 5 items, keeping the 5th would trigger the 25% discount. Not only would the dress be free, but I’d save $5 on the rest of the order. So I am keeping it too. I haven’t decided if I will save it and hope I lose weight or try to sell it. There are several facebook groups dedicated to selling extra Stitch Fix items. 

Overall experience: A+. I loved getting the clothes in the mail, being able to try them on (repeatedly) at my leisure, mix and match with items in my closet, and show them to family and friends before deciding. Plus, my stylist, Ashley, did a great job figuring out my style and stretching me just a little bit. I bought several items I never would have tried on in the store. The prices were a good bit higher than I usually pay (I almost never buy anything that’s not on sale) but I think it’s totally worth it to have someone pick out my clothes for me, and for the stress-free shopping experience. I have already scheduled my next fix and am trying to lower my expectations to not hope for another 5/ 5. Oh and the best part- my husband was thrilled! He even asked me to try and find a “Stitch Fix for men” 🙂

————————————-

Wasn’t that a great review? I think Stitch Fix did a fantastic job styling my mom! Click HERE to give my mom some referral credit and try it for yourself!!

Stitch Fix #1 – August 2015

If you haven’t heard of or used the styling service, Stitch Fix, you should keep reading! It’s a blast!

How does it work?

You go to Stitchfix.com, sign up for an account and fill out a style profile. This profile is incredibly detailed, and asks you everything about your size, weight, how you like clothing to fit various parts of your body, etc. They even have a section with photos of different types of styles that you rate by how much you like them. You can also link to your Pinterest style board or other photos to give them an idea of your favorite pieces. They really want to get an accurate idea of what you love and what you don’t, so that they can send you pieces you will like. Then, at the bottom, you can add a more detailed personal note with things like, “My favorite store is Banana Republic.” “I like more feminine, floral pieces,” “I don’t like scoop necks,” or “Don’t send me shorts,” etc. In addition to some basic info about my style, I noted on there that I’m a nursing mom, so I can’t wear fitted, tailored tops or one piece dresses without zippers, etc (They listened! Everything I received was nursing friendly!).

Then, after filling out your profile, you schedule your first FIX! You can add a note about what you’re looking for in that particular fix (like a blouse, shorts, etc), and then you wait.  They will send you a notification when your fix ships, and will collect the $20 for the styling fee.  Your 5 items are delivered to your doorstep, complete with a personal note from your stylist and a style guide giving you ideas for pieces to pair with your fix.

Try on the 5 items in the comfort of your own home, mixing and matching with your wardrobe, keep what you want, and send back what doesn’t work within three days. If you keep anything, your $20 styling fee is applied to your order, so the service is essentially free. If you keep all 5 items, you get 25% off your entire order, making the prices really reasonable for what you get. The items are more expensive than what you would find on the sale rack, or in cheaper stores like Old Navy. But the items I received seem to be more well made, and the fabric was higher quality. Plus! No trying on clothing in the dressing room while your toddler tries to climb under the door. Huge plus, just there. 🙂

But on to my review!

Back in the Spring, right when I began building my first capsule wardrobe, I started hearing things about this service that picked out 5 unique items just for you and sent them right to your doorstep! I was intrigued, so I decided to look into it. I had already pulled together most of my wardrobe by the time I signed up for my first fix, and the first date available for a fix to be delivered was almost a month out. No problem. I could wait.

However, before it shipped, I had found everything I wanted for my Summer capsule, and decided it would be unwise to buy anything else at the time. So I decided to wait for Fall’s capsule before I scheduled my next Fix. But I couldn’t stop thinking about it, and throughout the Spring and Summer, I saw various friends trying out Stitch Fix and really enjoying it. I got so antsy waiting for August (when I would begin to build my Fall capsule wardrobe), and my next opportunity to schedule a fix.

The calendar hit August, and halfway through, I logged in and scheduled my FIRST official FIX. It was supposed to arrive on the 24th, but shipped early. I watched the tracking like a hawk, and was thrilled to see that it would be here on the 21st instead! Three days early! It felt so much like the childhood excitement of Christmas morning; I couldn’t wait to see what my stylist had chosen for me.

I had asked my stylist for Fall neutrals, things that would work well in a capsule wardrobe. I specifically requested some tops, maybe a sweater and a fall dress. When I opened my box I found a note from my stylist, a styling guide for the items included, and these beautiful colors and textures:

IMG_7931

DSC_0825 (2)

My first item was the Octavia Window Scarf. I was in love. It was exactly what I was looking for: Neutral, versatile and INTERESTING. I loved how the simple pattern made it more interesting than a basic gray, but didn’t make it too busy to coordinate with almost everything in my Fall Capsule. It was also the softest scarf I have ever put on in my life. It was between 80 and 90 degrees the day my fix came, and I didn’t take the scarf off for hours. I have also worn it with the ends tied to make it into an infinity scarf, and it works perfectly that way as well. Verdict: KEPT!!

Second in my Fix was the Gil Plaid Dress. It fit me well (just a teensy bit big), and the A-line is just my style. But I felt like it made me look young. Plus, it reminded me of a Catholic school girl uniform, and I couldn’t get over that association no matter how hard I tried. My husband and Mom loved it, but… Verdict: Sent Back

DSC_0855

Third was the Sawyer Space Dye Dolman Sleeve Top. I absolutely loved the color. I liked the fact that there was a bit of a pattern to it, making it versatile, yet unique. It was incredibly soft and comfortable, and I ALMOST kept it. But it was a slouchier style which isn’t quite me, and I had just purchased a couple sweaters I liked better. So I couldn’t justify the price. It’s actually a little askew in the photo, and I preferred it even more in person. Verdict: Sent Back

DSC_0835 (2)

Fourth was the Finch Floral and Dot Print Tab-Sleeve Blouse. This was close. I felt like my stylist understood me (and how much I LOVE blouses), plus she stuck to the neutral color scheme I wanted, but the off white color in the pattern wasn’t my absolute favorite. And it was on the pricier side. Verdict: Sent Back

DSC_0826 (2)

Finally was the 41Hawthorn Abrianna Long Sleeve Knit Cardigan in Navy. Boring and simple, but this one was a perfect basic. Long enough to cover my butt, nice enough to go over dresses, and casual enough to wear with everything else. I debated about this one for several days, but decided to keep it. And I’m glad I did! I have already worn it *several* times. Verdict: Kept!

So that’s my fix for my Fall capsule! I have another one scheduled to come in November, for my birthday, because I will need to add a few COLD weather pieces to closet for my winter capsule. And it was just such fun. Even if I hadn’t kept anything and had lost my $20, the anticipation and surprise of it would’ve been worth every penny. Try it for yourself by clicking the Stitch Fix link above, or clicking on my referral link here! I hope you enjoy it as much as I did!